Building iWant - One Tap Discovery
Things have been pretty busy coming back to school. After meeting some fellow interns with my tenure in San Francisco, I agreed to help make an app on iOS for a few of them. This app already existed on the Android Play Store and was an outcome for their stint at “LA Hacks”. You can download it here:
https://play.google.com/store/apps/details?id=com.serendipity
You can also download the iOS App Here
https://itunes.apple.com/us/app/iwant-one-tap-discovery/id884069160?ls=1&mt=8
For now here is the Open Sourced Github Repo
The creation of the app itself was a learning experience for me. In this blog post I will try my best to share my knowledge and walk through step-by-step on how I made the app and what troubles I experienced (and if you can avoid it).
Building the Views
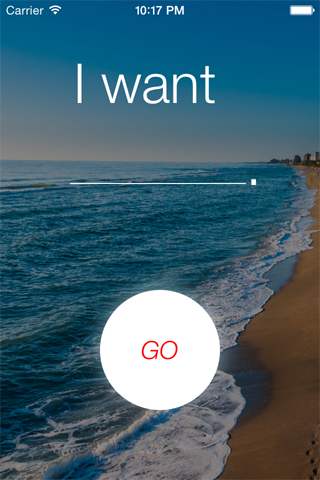
The first task I took on was creating each individual view. The original mockup for the app was to have a main “question” view, a loading spinner view and then open directly to Apple Maps. This changed in the later iteration of the app but this is how it started out. As you can see, the entire question view was to be zoomed & faded away to reveal the loading spinner. It was obvious that I had to construct all the views separately if I wanted to animate it like the mockup.

This led to my first time using Auto-Layout on iOS. With previous apps, I would simply set the frame of each element relative to the screen and/or other elements. This method however involved a lot of hard coding, pixel pushing and wasn’t very extendable when migrating to iPad or other screen sizes. Sure, there were auto-resizing masks but that still didn’t solve a lot of problems especially when laying out multiple elements relatively. In short, Auto-Layout is a feature provided by Apple (pretty recently) that lays out views based on constraints you give it. If there are too many constraints and it cannot be met, Auto-Layout will remove one or more of the constraints and if there are not enough constraints it will assume constraints.
I attempted to use Auto-Layout for all the views by using the constraintsWithVisualFormat method. In short, this method took in a string and the views and it would try and layout the views based on the provided format string. The learning curve for this was pretty high because I found that a lot of answers on StackOverflow about Auto-Layout were done using the provided View-Builder. Not to mention since you are writing the string format as a string the compiler will not warn you about any syntax/format errors in your format string until you compile + run the app. Also, another thing about using this method was that it would only apply the constraints in a “line”; as in if I wanted to layout two views exactly side by side to each other and each one 10 pixels from the top, I would have to write three constraints: 2 for the vertical constraints for each element and 1 for the horizontal constraint. There was no way to set the vertical constraints of both elements in one line making the code more verbose than desired.
Example:
@"V:|-10-[element1]"
@"V:|-10-[element2]"
@"H:[element1][element2]
To read more about how Auto-Layout works in Objective-C, Ray Wenderlich does a great job of explaining how to get started.
Doing the Animations
The animations were very simple in this app. As seen below, the main animation was simply the transition between the question view and the loading screen. All I did here was scale up the question view and animate the alpha so it appeared to fade out towards the user. All the views are actually already presented on the canvas, but are hidden due to the alpha. I did all the allocation at the beginning to reduce the amount of overhead of allocating and deallocating of the views (if we allocated a new view each time we presented it and deallocated it each time we faded it out).

The loading spinner is actually a circle image being rotated infinitely. Whenever the loading view is presented, the loading spinner begins spinning before the loading view fully fades in. When the loading view fully fades out, the spinner stops spinning. This was to avoid any extra processing of the main UI thread to animate the spinner. The background also zooms in and blurs in slowly while loading to give the impression that the app is “thinking”. If you want to know how I applied the blur read my other blog post here.
One tricky part was the “STOP” button. Since i was animating the background to zoom in and blur given a specific duration time and the STOP button could be pressed at any given time of the animation, I had to somehow reverse the animation from the current spot of the animation. If I simply animated in reverse when the user pressed STOP, the view would actually finish the animation (so the background would fully zoom in) and then perform the animation. To avoid this I set the transform and alpha of the background view to be the transform and alpha of it’s presentation layer (the layer being animated) since the actual layer of the views was already set. I then ran the animation based off of the presentation layer’s current values so pressing STOP didn’t look wonky.

(In iOS, when you animate a view it changes the values on the root layer immediately but changes the presentation layer’s values over the animation time. This means that if you step over the animation block, the values of the UIView will already be changed but the presentation layer of that view will change throughout the animation.)
Using Yelp API
The app uses the Yelp API to determine the list of restaurants to choose. I used OAuthConsumer framework which can be found Open Sourced here. The parameters I passed into the Yelp API was the Lat & Long of the user which was determined via CLLocationManager (which was also an asynchronous call so I had to wait for that to finish) and the method:
startUpdatingLocation
and also the search term. If the user did not provide a search term I would just do a default “restaurants” search term. Note: OAuthConsumer has trouble with “+” characters between words in the URL so I had to replace those with the “%20” encoding.
I would establish a connection for the Yelp API and wait for the response on a separate thread (not the main UI one) established using the NSURLConnection class. Once a response was provided from the API, I would convert the JSON into an NSDictionary response using the handy class NSJSONSerialization provided by Apple. Here was where I encountered difficulty. Our algorithm to determine the best location was based on Distance, Rating, Price and Closing Time. Luckily for me, the Yelp API provided the location & rating of the place. However, it did not provide the Price or Opening/Closing Times (Grrrrrrrrrrr). They did provide the URL for the Yelp page of the business though. This meant I had to do some scraping on their website.
I had around 20 results from the response and I had to scrape all of the websites. There was no way I was going to do this on one thread sequentially - that would take forever. I had to spawn a thread for each website I wanted to scrape. Luckily for me there was a nice class that helped me do that instead of me manually creating new threads and dispatching them with GCD. This class was called NSOperationQueue. All I would do is spawn a new NSOperation for each result - so essentially 20 background threads for each scraper and dump it on the NSOperationQueue. On each thread I would retrieve back the entire yelp website via HTML format and I had to parse that per result. Here I used TFHpple to help me scrape the website for the Price and Opening/Closing Times. Ray provides another great tutorial here.
Scraping the Yelp website was pretty nasty considering not all the businesses provided opening/closing times and that the website would undergo changes in the future which would require me to rewrite this app. Why can’t Yelp just provide the opening/closing times via their API? I have no idea :(. After each operation returns their data and I scrape the website for all the info, I apply the restrictions for each business. The restrictions were:
3.5 stars or higher.
$ or $$ in price
It could not be closed or closing within 30 minutes.
If nothing satisfied these constraints, I would not put it into my valid set. Remember how I said not all businesses included their opening/closing times? For those I assume between 10 AM and 9 PM the place is open - otherwise I assume it’s closed. We also applied a 30 minute buffer to account for travel time for the user.

Once all the scrapers come back and I have my valid set, I had no way of telling when the NSOperationQueue was finished running all of it’s operations. This is when I use KVO and assigned a key to the NSOperationQueue so that i could check the number of operations in the NSOperationQueue within the method:
- (void)observeValueForKeyPath:(NSString *)keyPath ofObject:(id)object change:(NSDictionary *)change context:(void *)context
Once the NSOperationQueue finished all of it’s operations, I would either notify the main view controller if there were any valid results or not in which case I would pass an error - or if there were valid results I would determine which one was the best and present that to the user. Since KVO operated on a separate thread I had to call dispatch_async on the delegate call backs since they were showing UIAlertViews and such. (If you don’t use dispatch_async on the main thread with KVO you get really wonky stuff).
GeoCoding
Don’t get me started about Apple’s Geocoding. If you’re going to use any type of geocoding - use Google. Apple’s servers were down for Memorial Day weekend and everyone on the Apple Dev Forums were freaking out and it didn’t get fixed until Tuesday (starting Friday). Grrrrrrr.
Geocoding is essentially taking an address/location such as “1 Market Street, San Francisco, CA” and converting it into a Latitude/Longitude. Of course you cannot geocode locations yourself if you have no data - which is why I used apple’s convenient geocoding. Reverse geocoding is essentially doing the opposite - in which you provide the Lat/Long and get back an address. Here’s the thing - Yelp’s API doesn’t always return back the Lat/Long of a business - it only returns back the address so I had to geocode the address to pass into MapKit (Apple’s provided Map framework) since MapKit only took in Lat/Longs. This meant that once I got the addresses back from the API I had to geocode them into Lat/Longs by passing the address to Apple’s Servers and wait asynchronously for that. However, Apple’s servers went down for the weekend and it didn’t get fixed for 3 full days. That meant all the apps and devs that were using their Geocoding feature just didn’t work for Memorial Day weekend.
Anyways, enough about my terrible experience with geocoding. Once I got the location of the address in Lat/Long format, I determined the distance between the User’s current location and the business’s location. At this point in time I have the 4 components I need for the algorithm to determine the best location. Price, Distance, Rating and Closing Time. The algorithm (which can be found in my source code) essentially takes the idea of diminishing returns to determine the best result. The algorithm would apply a rating to each business and the highest rated business in the end was chosen to be shown to the user first. The algorithm gave the highest ratings to the results that fit our ideal restaurant and substantially lower scores to those that were further and further away from the preferred result. For example: The preferred distance was 0-1 miles. For results within that range they were get a decent rating but anything past that preferred result would nonlinearly get a lower rating. Of course the user could choose other restaurants if they didn’t like what was presented to them (as shown in the gif above) but we wanted to be decently authoritative in telling which business the user should visit.
Opening Maps
When the user clicks “YES” on the results page, I want to provide the directions to the user. Luckily, Apple provides a very simple way of doing this. All i had to do was create two MKMapItems with the coordinates of the user and the coordinates of the business and call a function:
openMapsWithItems: launchOptions
which automatically opens the Apple Maps application with the options provided (Walking, Car, etc). Here it is shown below:

Unlike the Android version however I cannot provide a “Toast” or visual alert when opening the App to provide details of the place. The only thing I could change was the name that appears on Apple Maps. The results page was actually part of my 2nd iteration of this app. The first iteration of the app looked like this:

With no results page, it would simply open the location right away. However, this wasn’t very practical for me since I tended to look the location up on Yelp anyways. This led me to create the results page and the ability to open the location up in Yelp and scroll through various locations.
Final
The app iWant is just a fun thing I did on my spare time. It’s an app that is supposed to help users find places to eat or go to in a very quick and simple way with no fuss or ugly menus to look at. The process was to help find places that were open, relatively cheap, and accessible to the user. It was not made for users that wanted to plan on their day or make reservations - it is simply a discovery app that encourages spontaneity and finding new places.
The entire codebase is open sourced on my github here
If you have any questions or want to play around it by all means fork it or send me a PR. I would also like to point out this was an app I made for my friends and I did not come up with the idea/algorithm - it was simply a fun learning project for myself.
Special thanks to: Tony Jing, Gary Guo and David Wang.